The one thing that showed a negative effect on all three types was the fact that you are limited by your own eyesight, regardless of what types of open or iron sights are on your rifle.
I wanted to demonstrate on paper, the difference in precision between an inexpensive magnified scope and the factory iron sights on my little Mossberg 702 Plinkster. The sights on the Mossberg aren't too bad for what the rifle is, which is a very inexpensive "Plinking" rifle. It's not designed to be a "precision target" rifle, but it is fairly accurate when you understand the ammunition and the limitations of the ammo as I discussed previously.
Here is a pic of the "testing" grounds. My backyard "Stumpilicious" range. From my shooting position to the backstop/stump it is exactly 30m or 32 yards. Due to the angle of incline I cannot shoot from the prone position without seeking medical and/or chiropractic attention afterwards. I try to set up as "field expediently" as I can for realism in the shot process. No sandbags or store bought "bench rest" equipment. I shoot off of a backpack like a hunter or soldier might for as steady as a position as I can manage.

For a generalized idea of how it looks with iron sights, I tried my best to get the camera into a 7:1 zoom and took this pic. I was trying to get the bulbous front sight post in the picture to show how it completely covers the 2" target from this distance. If you pressed your nose against the screen, I did just now, too.

While I was attempting to get my shots in with the scope on, my groups quickly deteriorated into a big fat mess, so before I could continue I had to run the bore snake and some Hoppes #9 solvent through the barrel a couple of times and then foul up the barrel with about 15 shots before it was back into "precision" mode. Fortunately, I kept all of my targets which will be used in the next installment of the blog.
Back to business.
Two 5 shot groups WITH optics. I did change the magnification between the two groupings. Both groupings gave me .75" groups. (The 4 ring is a hair over 2" diameter, as an FYI)

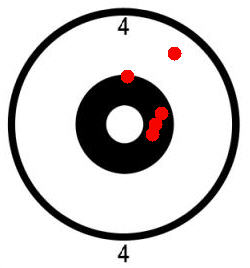
I can live with 5 shot groups like these.
Moving on to the factory open sights.
Same rifle
Same shooter
Same ammo
Same bore conditions
Same distance
Same everything....except I take the scope off of the rifle and go strictly with the factory open sights.
Two 5 shot groups, Open sights.


That is a big difference, in my opinion. Not that the rifle isn't accurate with iron sights, but the precision percentage just drops off the face of the planet. These 5 shot groups went to 1.25" and 2" respectively.
Why?
I am 39 and wear glasses, corrected to 20/20. I see the target pretty good. The target is somewhat small, being 2" on the 4 circle and the diamond is 2" top to bottom, side to side, so I'm working with 2" at 32 yards.
The visualization of the target through coarse iron sights with a big "bulb" on the tip doesn't give me any opportunity to fix my sights WITHIN the target area. I just have to put the front sight post over it, breath and squeeze and hope for the best.
With the magnified optic, I get a minimum of a 3x zoom and very fine crosshairs which I can try to control on a much smaller level, thereby gaining a huge increase of muzzle control within the actual target area.
I also wanted to show how a magnified optic with a good zero can really help with your shot placement over a rifle with iron sights.
These two shots were taken on a whim while trying to decide which brand of ammo was working better with the rifle on a previous shooting day. These are with the scope.


Aiming for the very center of the Lucky Gunner shamrock, these are the results with a 3x scope. Not bad.
It got very ugly at the same distance with the factory open sights. I could barely even see the shamrock, let alone put a shot in it. I put up a Lucky Squirrel and the Lucky Gopher just to see how it would go with open sights.
I took two shots at the squirrel, came over to the shamrock, then went and looked at my targets.
My first two squirrel shots were in the tail, not hitting "body" and the shamrock miss was so bad that it actually made me a little bit angry at myself. I don't like to miss that bad. I went back to my table, loaded up 5 rounds and gave that squirrel a little bit of quick fire love.

Funny thing, the 5 shots of quick-fire love on the unlucky squirrel was probably the best 5 shot string that I shot that day with the open sights. I didn't go through my typical shot routine, just tossed the barrel up, put the squirrel center mass in my open sights, and let loose.
In conclusion, with open sights vs. magnified optics, there's a fairly good reason why shooters opt more towards the scope as an upgrade over the target aperture and hybrid tactical aperture iron sights.
Price. My inexpensive little Tasco 3-7x20 scope is an $18 investment and as the results show, it is effective for the distances I am working within.
To gain that type of precision percentage with an upgrade of open sights you can spend as little as $10 for a different front sight post all the way up to hundreds of dollars for top quality target aperture sights.
As a quick summary of the rifle, scope, and ammunition used in this testing...
Rifle: .22lr Mossberg 702 Plinkster
Scope: Tasco 3-7x20
Ammunition-CCI Blazer High Velocity
(With the exception of the first Shamrock shot in the left leaf, that was Federal Bulk HV)
Range - My backyard "Stumpilicious" range. 30m/32 yards.
Targets courtesy of my friends at http://www.luckygunner.com

No comments:
Post a Comment